Images & Albums
Images are uploaded and organized in “Albums” that can be viewed and shared with others. When you login to Viewbook you will be in the most recently created "Album" by default.
Make a new Album
Click the "New" button and choose "Album" from the drop down menu. To change the title double-click on it and type a new title. Hit the return/enter key when you are finished. You can now upload images into this "Album".
Upload images
Uploading your photos is straightforward; however, it is good to know a few things before you start. Viewbook creates versions of your images in various sizes. Larger files are created for desktop computers. Smaller files are created for mobile phones. We leave the originals untouched in case you need to send them to a client or download them yourself.
You can upload photos to any "Album” in your account. Albums are found near the top left corner of your screen, conveniently located under the heading "Albums." To create a new album, click the +/New button above the "Albums" heading and choose "Album" from the drop down menu. Highlight your new album or an existing album and click the "Upload" button. The "Upload" button is located a few centimeters to the right of the +/New button. A dialog to select files will now open. You can also drag & drop files from your computer into the area in the center of the page. In a new album the drop zone says "Drop images here." In an existing album you will see the images that are already in it.The upload will begin immediately.
During the upload process, you may remove an individual image from the upload queue by clicking the "Remove" icon in the top right corner of the image's thumbnail. To add more images, click "Add," or drag & drop images onto the upload window.
Image size and resolution
As long as the images are less than 30MB, no preparation is needed. To improve upload and processing speed, we suggest using files that are around 3.1 megapixels. Generally, that means you'll have to resize your images to fit about 2100pixels on the long side. You may find this chart helpful.
File types
Jpegs (JPG) are best, but we also accept PNG, GIF and TIFF files.
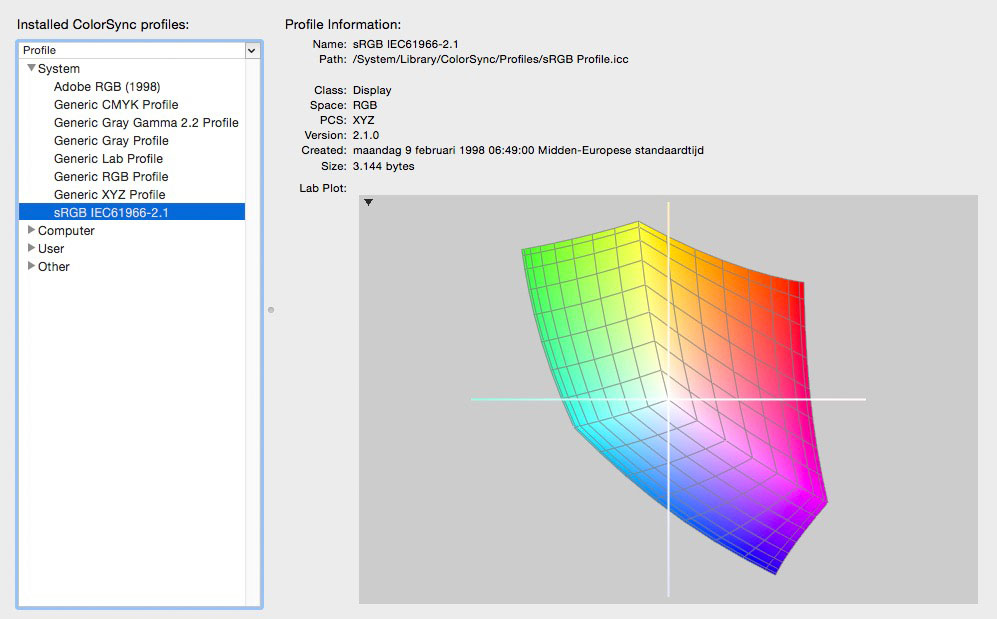
Color profile
We recommend sRGB, but we'll convert your files to the sRGB color space if you use a different profile, or if you don't know what a color profile is.
Upload order
Your files are uploaded in alphanumeric order during each session. Once they are uploaded, you may change the sequence of images by dragging and dropping them to the desired order. This is done in the "Organize Images" tab. When uploading images to an existing album, their order will begin after the previous upload. So, if your album contains file5, file6, and file7, and you upload file2 and file4 at a later date, the final order will be:
file5, file6, file7, file2, file4.
Organize Images
Reorder images
Click on an image while in the "Organize Images" tab. Drag and drop it to the spot you'd like it to be. If you are building a website, I assume you have basic computer skills, but if you aren't familiar with selecting single and multiple files on a computer, look at this and this. You can also see how I did it in the video above.
Move images to another Album
Select one or more images and drag them to another "Album" in the list of albums.
Delete images
Click on an image to select it. The highlighted image will have a border around it. Click the "Delete" button in the top bar, and the image will be deleted. Keep in mind, if the image is used in another album it will not be removed from the other album. If you want an image to be completely expunged, all instances of the image must be deleted.
Organize preferences
"Zoom" and "Contrast" controls are located at the bottom of the "Image organizer" tab. They change the size of the poster images in your account and make the work area either light or dark. Set the size of the images and the background shade to suit your needs.
Image Titles and Descriptions
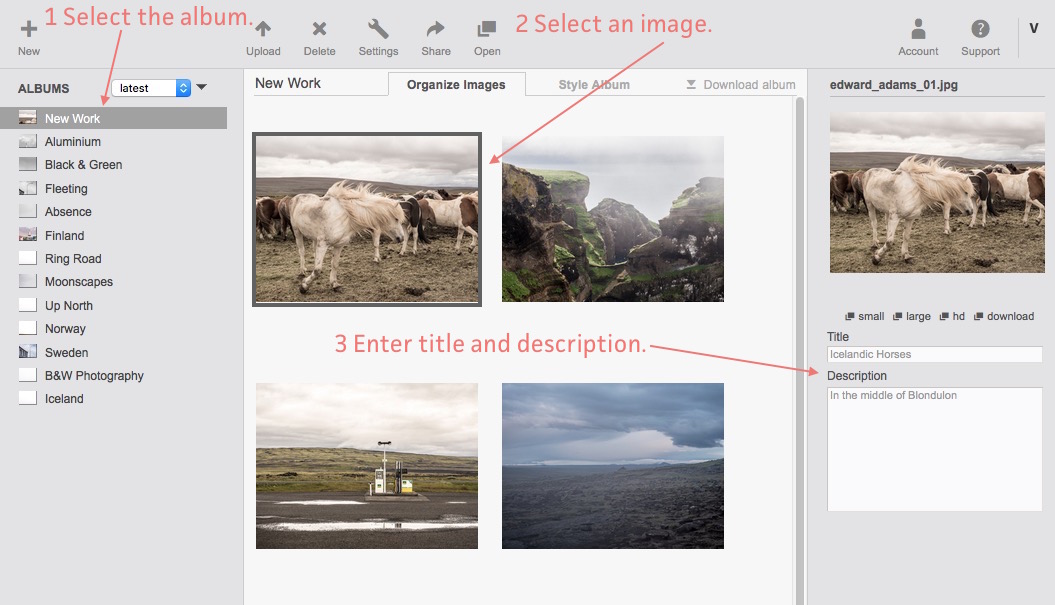
If you would like to add titles and descriptions to your individual images you may do so in the "Organize Images" tab. The tab displays by default when you select an album.
- Select an album.
- Select an image.
- Enter title and description
Keep in mind that the color and font of the Album Title, Album Description, Image Title, and Image Description are the same as the Base Text color for the page, but the font size matches that of the Menu. These settings are found in the Text tab in the site editor.
Alt Tags
Alt Tags
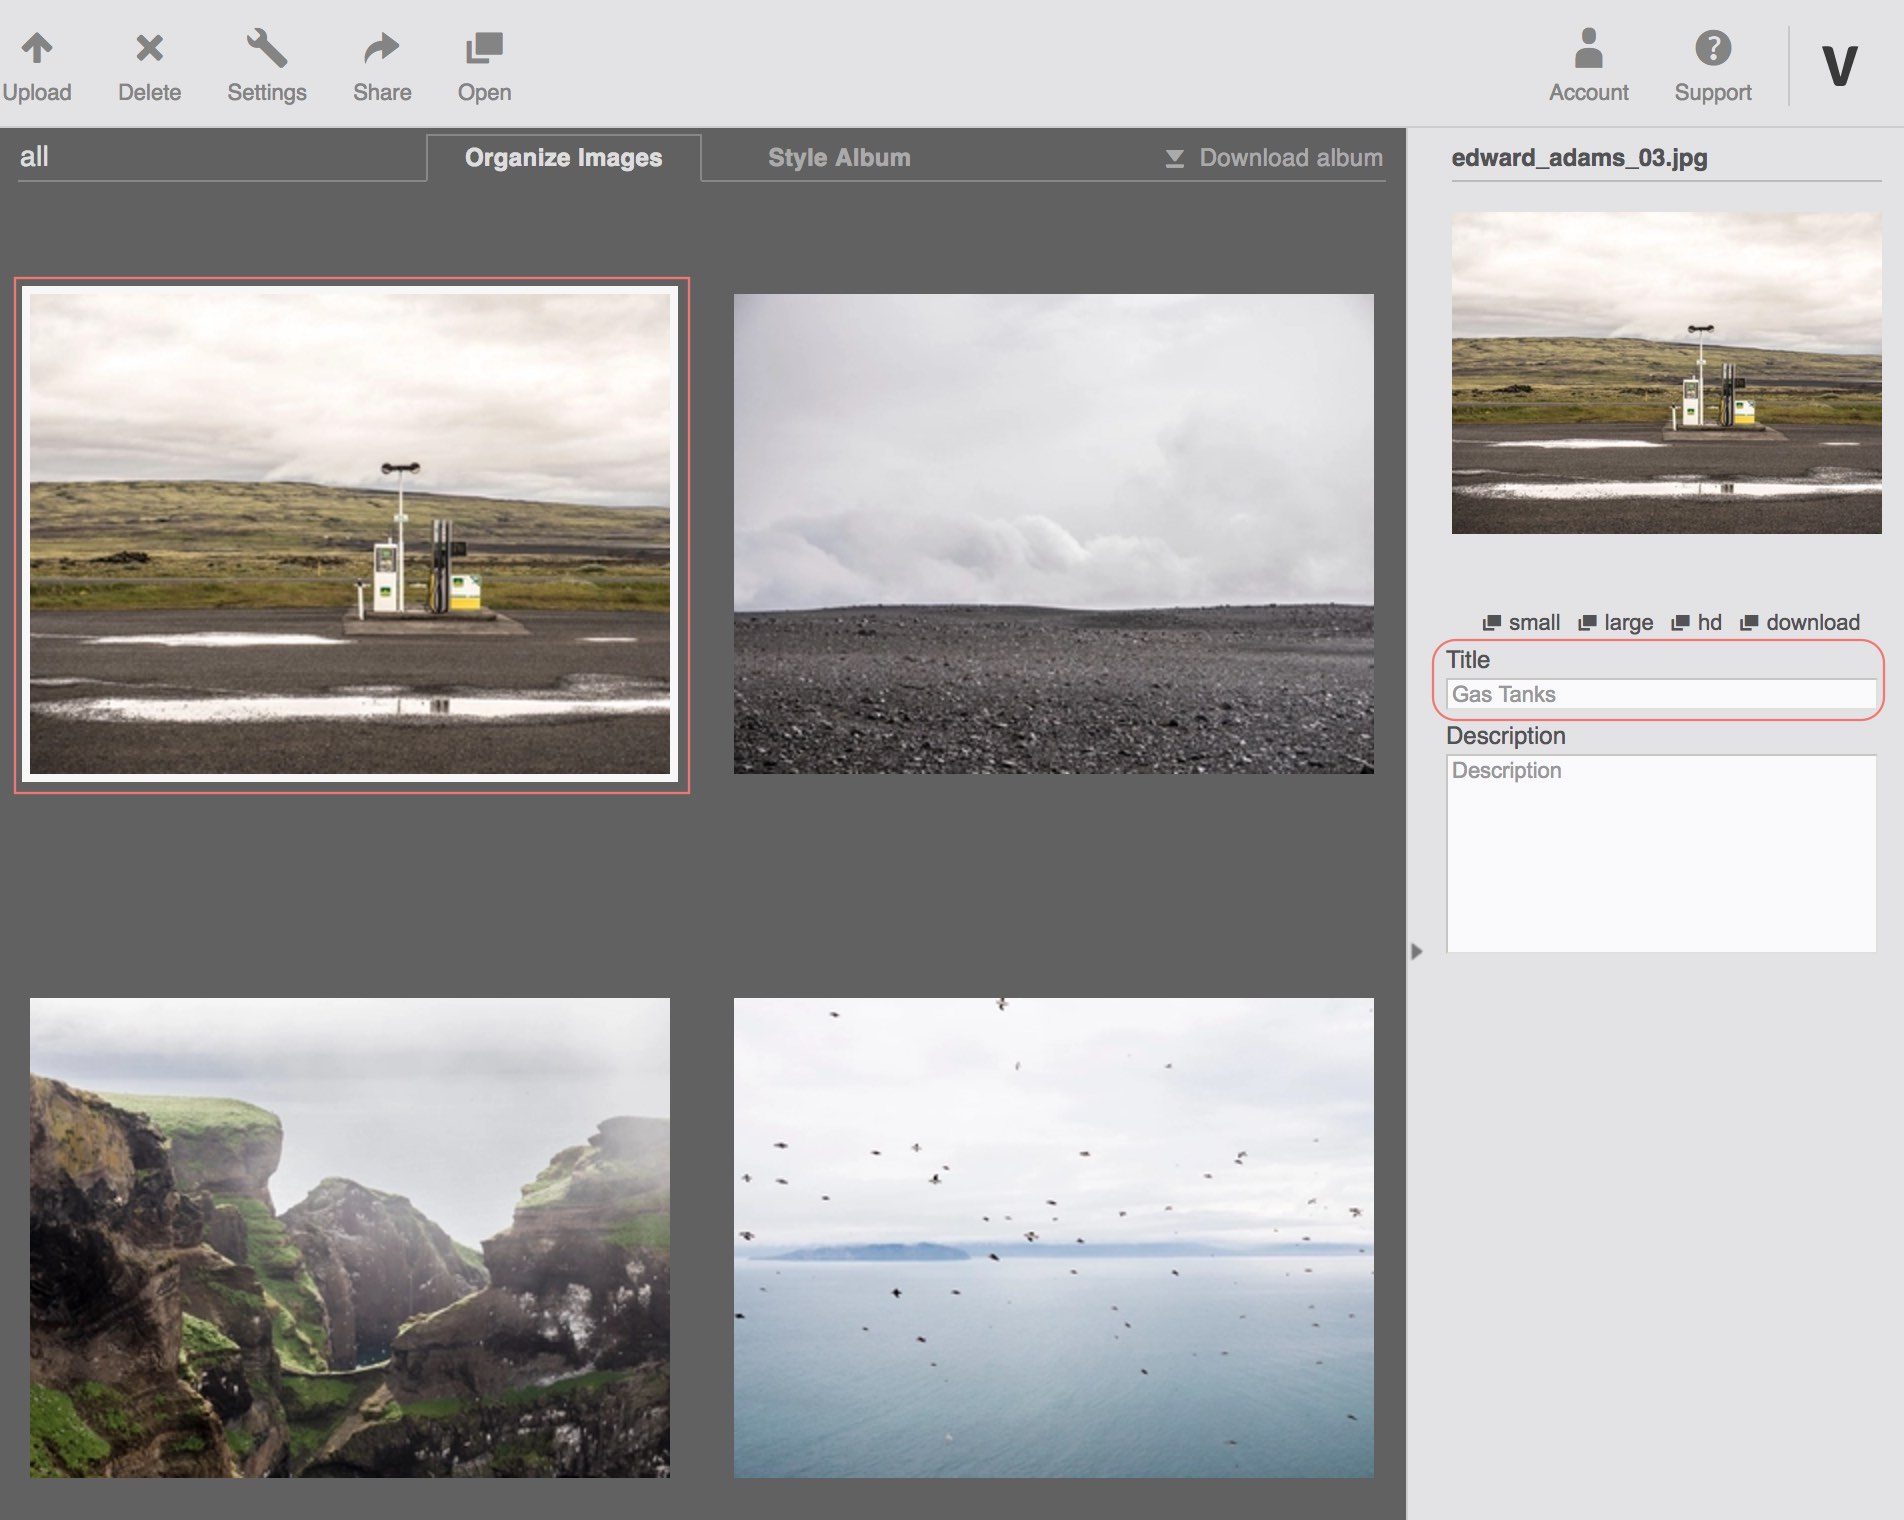
You can set alt tags for your images in the image manager.
- Click on the image to highlight it in the manager.
- The image will open in the side panel. If you add a title to the image it will become the alt tag for this image.
This may make a small difference in ranking, but don't expect miracles.
Find Image URL
To get the URL of an image hosted by Viewbook:
- Highlight the album.
- Click on the image.
- Click one of the links in the column on the right. There are three choices: small, large, and HD.
- The image will open in a new browser window. Copy the URL from the address bar and paste it where you would like to use it.
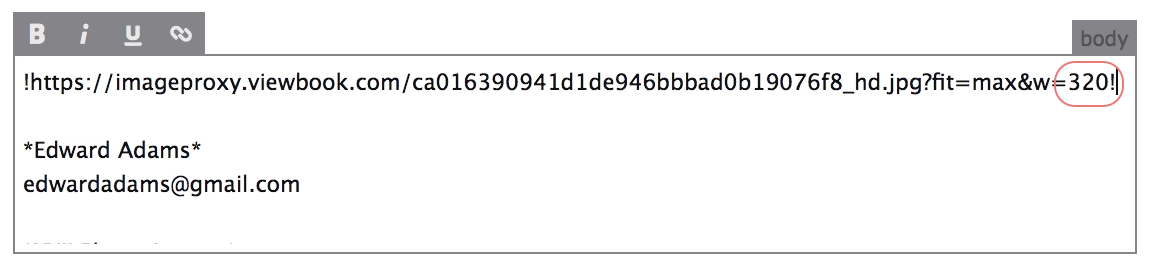
If the small, large, or HD options aren't suitable for you, you may change the dimensions by altering the number at the end of the URL. This number represents the maximum displayed width.
Style Albums
You can use your albums in various pages in your Viewbook site, or you can use them on their own. Whichever way you choose to use your albums, you will need to style them first. There are lots of options, including thumbnails and navigation arrows. Look through the settings yourself, and remember that you must style the album wherever you use it. Albums can be used:
- In a Slideshow Gallery
- In a Scrolling Gallery
- In Square Grid
- With other albums in a Collection Page
- On its own! Send a link to the album to a client or friend without adding it to your website.
Although they are all similar, each gallery has different style settings. Experiment to see what works for you.
Share Albums
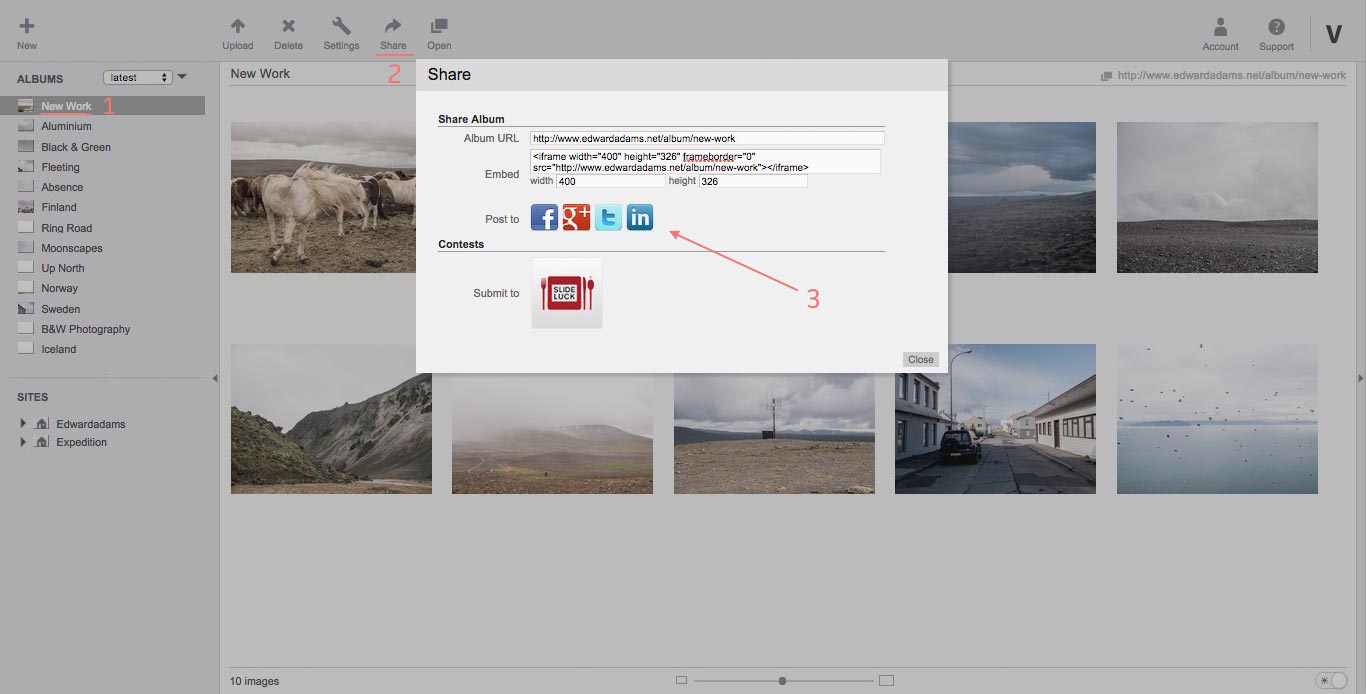
"Albums" provide a quick way to share your images with others. Open an Album and click "Share" in the top bar to see your options.
Share on Social media
- Highlight an album.
- Select the "Share" tab.
- Click one of the social icons.
You will be guided through an authentication process. The rest will take care of itself.
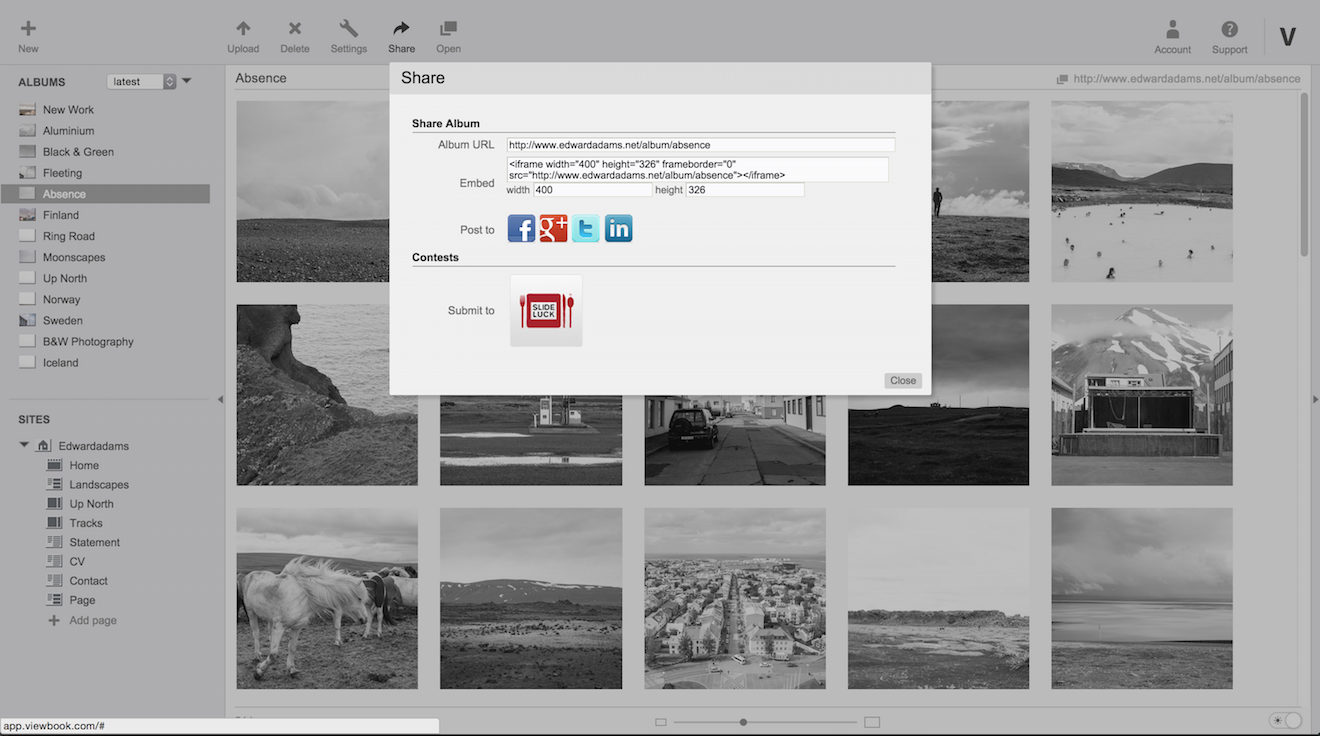
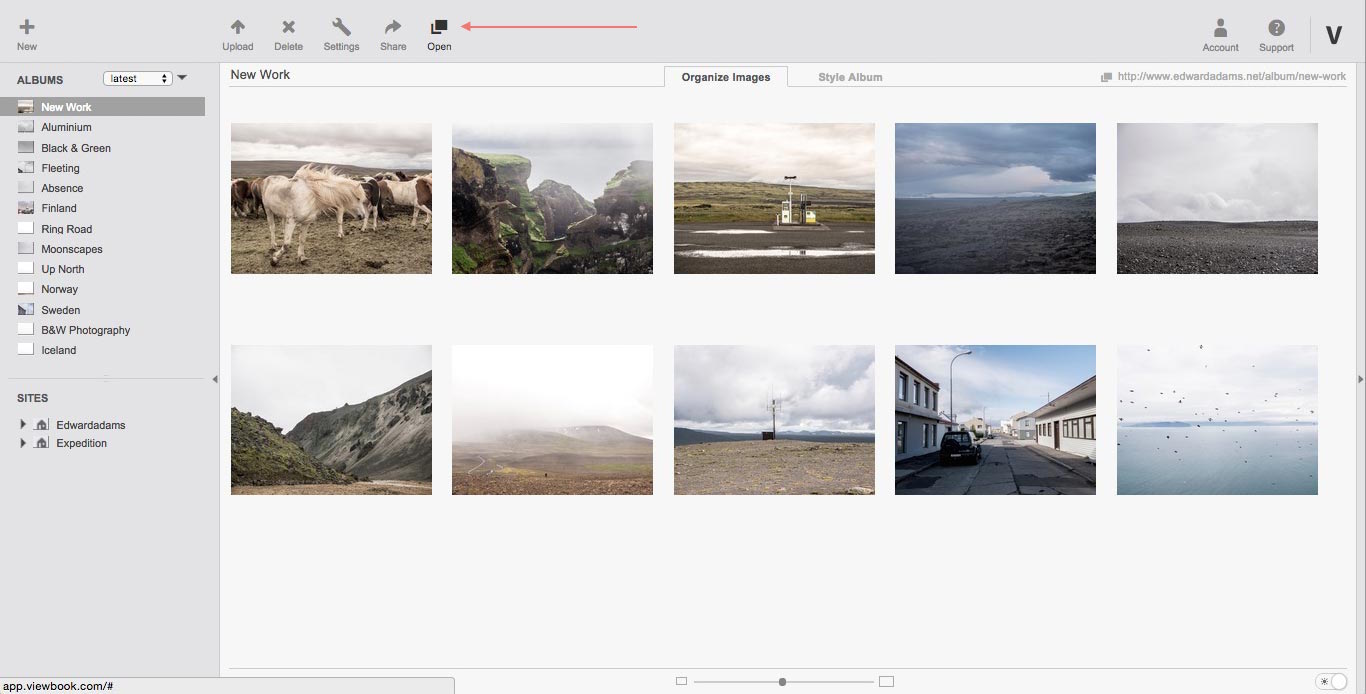
Share a link
- Highlight an album from the list.
- Click the share tab.
- Get the link from the "Album URL" field.

You may also click the "Open" button while editing any page or album and copy the URL from the address bar of the open page in the browser.
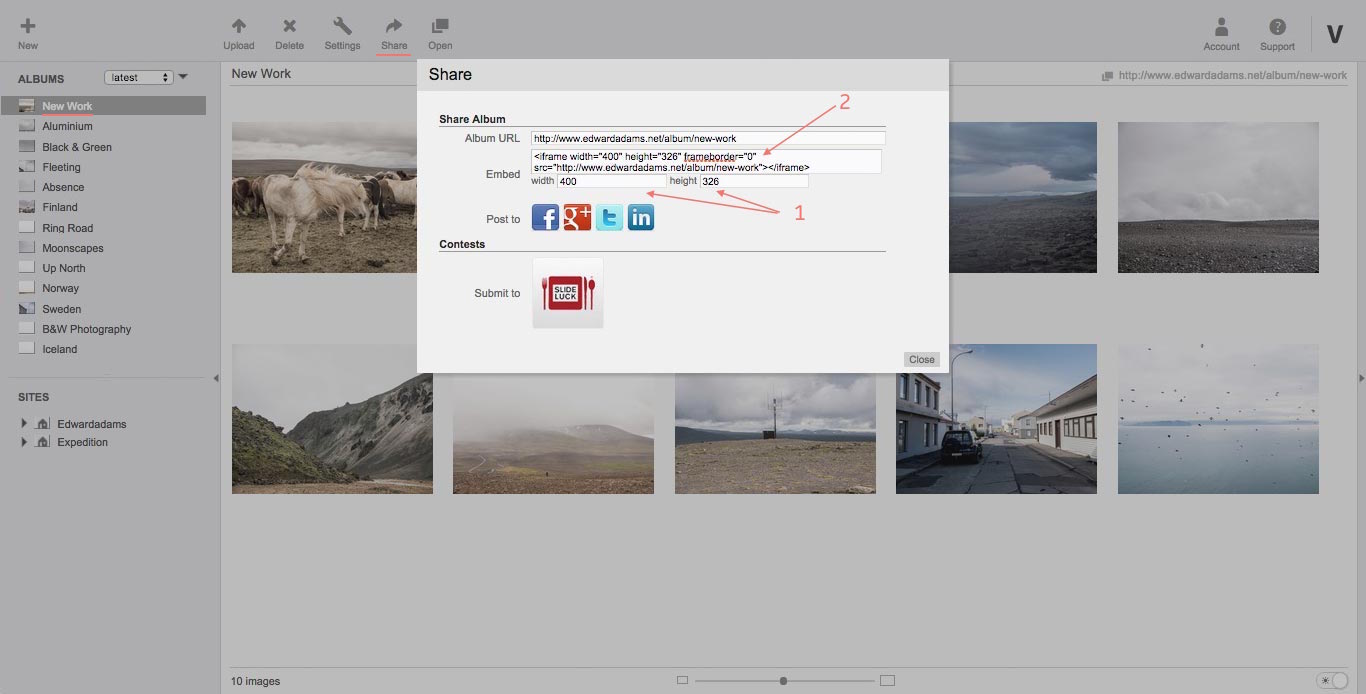
Embed
- Set width and height.
- Copy the "Embed" code.
Paste the code wherever you want to embed the album.
Download Images or Albums
There are several ways to download individual images or entire albums from your Viewbook account.
- Click the "Download album" button while your album is selected in the manager. A page with will open and present you with the option to download the entire album or a single image.
- Click the download button while an image is selected in the "Organize Images" tab.
- Check the "Enable Download" option in the page your album is used in (or in the album itself) so both you and anyone who views the page or album will be able to download the images.
Delete an Album
It doesn't matter what sort of page it is, if you want to remove an album from any page you must:
- Highlight the album you want to remove by clicking on it.
- Click the "Delete" button in the top bar.
If you would like to remove an album from your account:
- Highlight the album in the list of albums by clicking on it.
- Click the "Delete" button in the top bar.
- Confirm that you want to delete the album by checking "Delete Album" when prompted.
Lightroom® Plugin
Adobe® Lightroom® is a very popular photo management and image editing tool. It is possible to export images from your Lightroom® library directly to a new or existing album in your Viewbook account.
- Download the Viewbook Lightroom® Plugin.
- Unpack the "Viewbook.lrplugin_0.9.2.zip" file you downloaded by double clicking on it. Viewbook.lrplugin will appear. Move Viewbook.lrplugin to a safe place. Mine is in the Documents folder, but you can put it anywhere.
- Unpack the "Viewbook.lrplugin_0.9.2.zip" file you downloaded by double clicking on it. Viewbook.lrplugin will appear. Move Viewbook.lrplugin to a safe place. Mine is in the Documents folder, but you can put it anywhere. Open Lightroom®, go to the "File" menu, and click on "Plug-in Manager."
- Click the "Add" button at the bottom left of the Plug-in Manager. Navigate to where the plugin is on your computer, choose it, and click "Add Plug-in." Then click "Done."
- Select images form your Lightroom® library and click "Export" near the bottom left of the Lightroom® library screen.
- Select Viewbook® from the "Export To" box at the top of the export dialog box.
- Authorize the plugin for use with your Viewbook® account. Click the "Login" button and follow the prompts. You will be guided through the authorization process.
- Create an album and upload your selection or choose an existing album. Be sure to click the "Export" button after the album is selected.
- You will be notified when the upload is finished.
Color Profiles
Aside from making your pictures presentable, you don’t have to do any image preparation before uploading photographs to Viewbook. Any jpeg, tiff, or png that is less than 30mb can be uploaded.
When you upload your images to Viewbook several versions of the file will be created. These are the files that appear on your website. Each version will be the appropriate size, and it will be converted to the sRGB color space. If the image doesn’t have a profile, sRGB will be added. If the file is Adobe 1998, it will be converted to sRGB. sRGB is the defacto color profile of the internet, so uploading pictures with a larger, juicier profile will not make a difference on your site. If you want to deliver higher quality versions of the photographs to someone via your site, then upload the big ones, but if your goal is simply to have a nice website, then don’t worry about the profile too much.
To speed things up, you may want to process the images before uploading. You may do this in Photoshop, or whichever image editor you prefer. You may also use the fantastic export options in Adobe® Lightroom®. We have a plugin that works very well with Lightroom®. Saving your files as an 8 bit sRGB jpeg should be fine. There is no need to mess around with the other settings unless they contribute to an aesthetic you are trying to achieve. Also, don’t worry about compression. Any high percentage jpeg is fine. As I mentioned before, a new version will be created, and it will be a size that works well in our galleries, even if you upload a 30mb 16bit tiff.
Protection and Copyright
This is a real dilemma. We are in the "displaying images" business but we also want to (help) protect your images. We try to strike a balance between the two.
Protecting images online is almost impossible to accomplish. The only way to protect your images from being stolen is to not put them online at all. In the end, a simple screenshot is enough to steal an image.
Since you do want to show your images online, we’re constantly exploring ways to better protect your images like right click protection or tracing images online.
Does "no right mouse click" code protect my images?
The images in Viewbook albums are right-click protected. However, “no right click protection” can be bypassed very easily by disabling JavaScript in the browser, by taking a screenshot, or by looking at the source code.
Will watermarking my images protect them from being stolen?
Watermarking simply provides the copyright owner with specific identification properties to mark their images. Watermarking is no different than engraving your name or identification information. Unfortunately, this does not prevent the items from being stolen.
What can you do?
- Upload low resolution versions of your images.
Low res images are less desirable to thieves. That said, they also don't look as awesome on your site. - Use the copyright protection symbol.
This may be #2, but it is the first step you should make to protect your images. It lets people know that your images aren't available for free, and that they must ask your permission before using them. - Add a watermark.
Adding a watermark to the image is one of the major ways to prevent unauthorized use of your photos. When you add a watermark, you need to consider where on the image to place it. If you place it in the center, over important details of the photo, you are actually destroying the image. You can place the watermark in a corner but make sure that it is positioned in a way that does not allow cutting this part of the image and using the rest. - Join an organization like asmp.org or www.pictoright.nl
Note: Viewbook does not have watermarking functionality, so you have to do this before uploading your images into Viewbook.
Frequently Asked Questions
How do I make my site Flash free?
Can I edit my site while I am uploading images?
You may open Viewbook in a different browser window if you'd like to continue working while your files upload.
Why are my images loading slowly?
There are a few possible reasons for slow loading times.
- Your network connection is slow for some reason.
- Viewbook is slow for some reason. Maybe EVERYONE is uploading at the same time.
- Our CDN is experiencing issues in your locale.
- This is probably what it is - The images aren't cached at the CDN yet.
A CDN caches the images on their servers so they will load faster all over the world. The only downside to this is the that the images load slowly the first time. After that, they are super fast. When you upload a new batch of images, look through the album online. This should expedite the caching process.
How many images can I upload?
As many as you like. There is, however, a 30mb per file size limit.
Why don't you have phone support?
There are so many reasons! Here are the biggest:
- SPEED! There is no need to ask what your account name is, what your email address is, etc. I get your email, I click a link, and I am in your account without having to ask a slew of questions.
- CLARITY! You can send us supporting information like screenshots or screen captures to illustrate your problems, and we can do the same to illustrate our proposed solutions.
- ORDER! Looking at incoming requests visually enables us to quickly see what problems are being reported and when. If lots of people are having the same issue we can analyze and begin solving the issue before we respond to your message, without the distraction of a constantly ringing phone.
- PRECISION! Most support with around the clock phone service is outsourced to a call center. Call center employees are generally not experts. They work from a script, and they delegate your requests accordingly. You still have to wait until the expert is available. At Viewbook, we are all experts, and we know the software very well. If you need the assistance of a developer you may need to wait a bit longer, but you are far better off emailing us than you are getting some dude in a call center. It’s worth the wait.
Is there a text limit for image descriptions?
The limit seems to be around 4,319 characters or 625 words, depending on the words.